Reading Reports From The REST API (C++ Example)
Overview
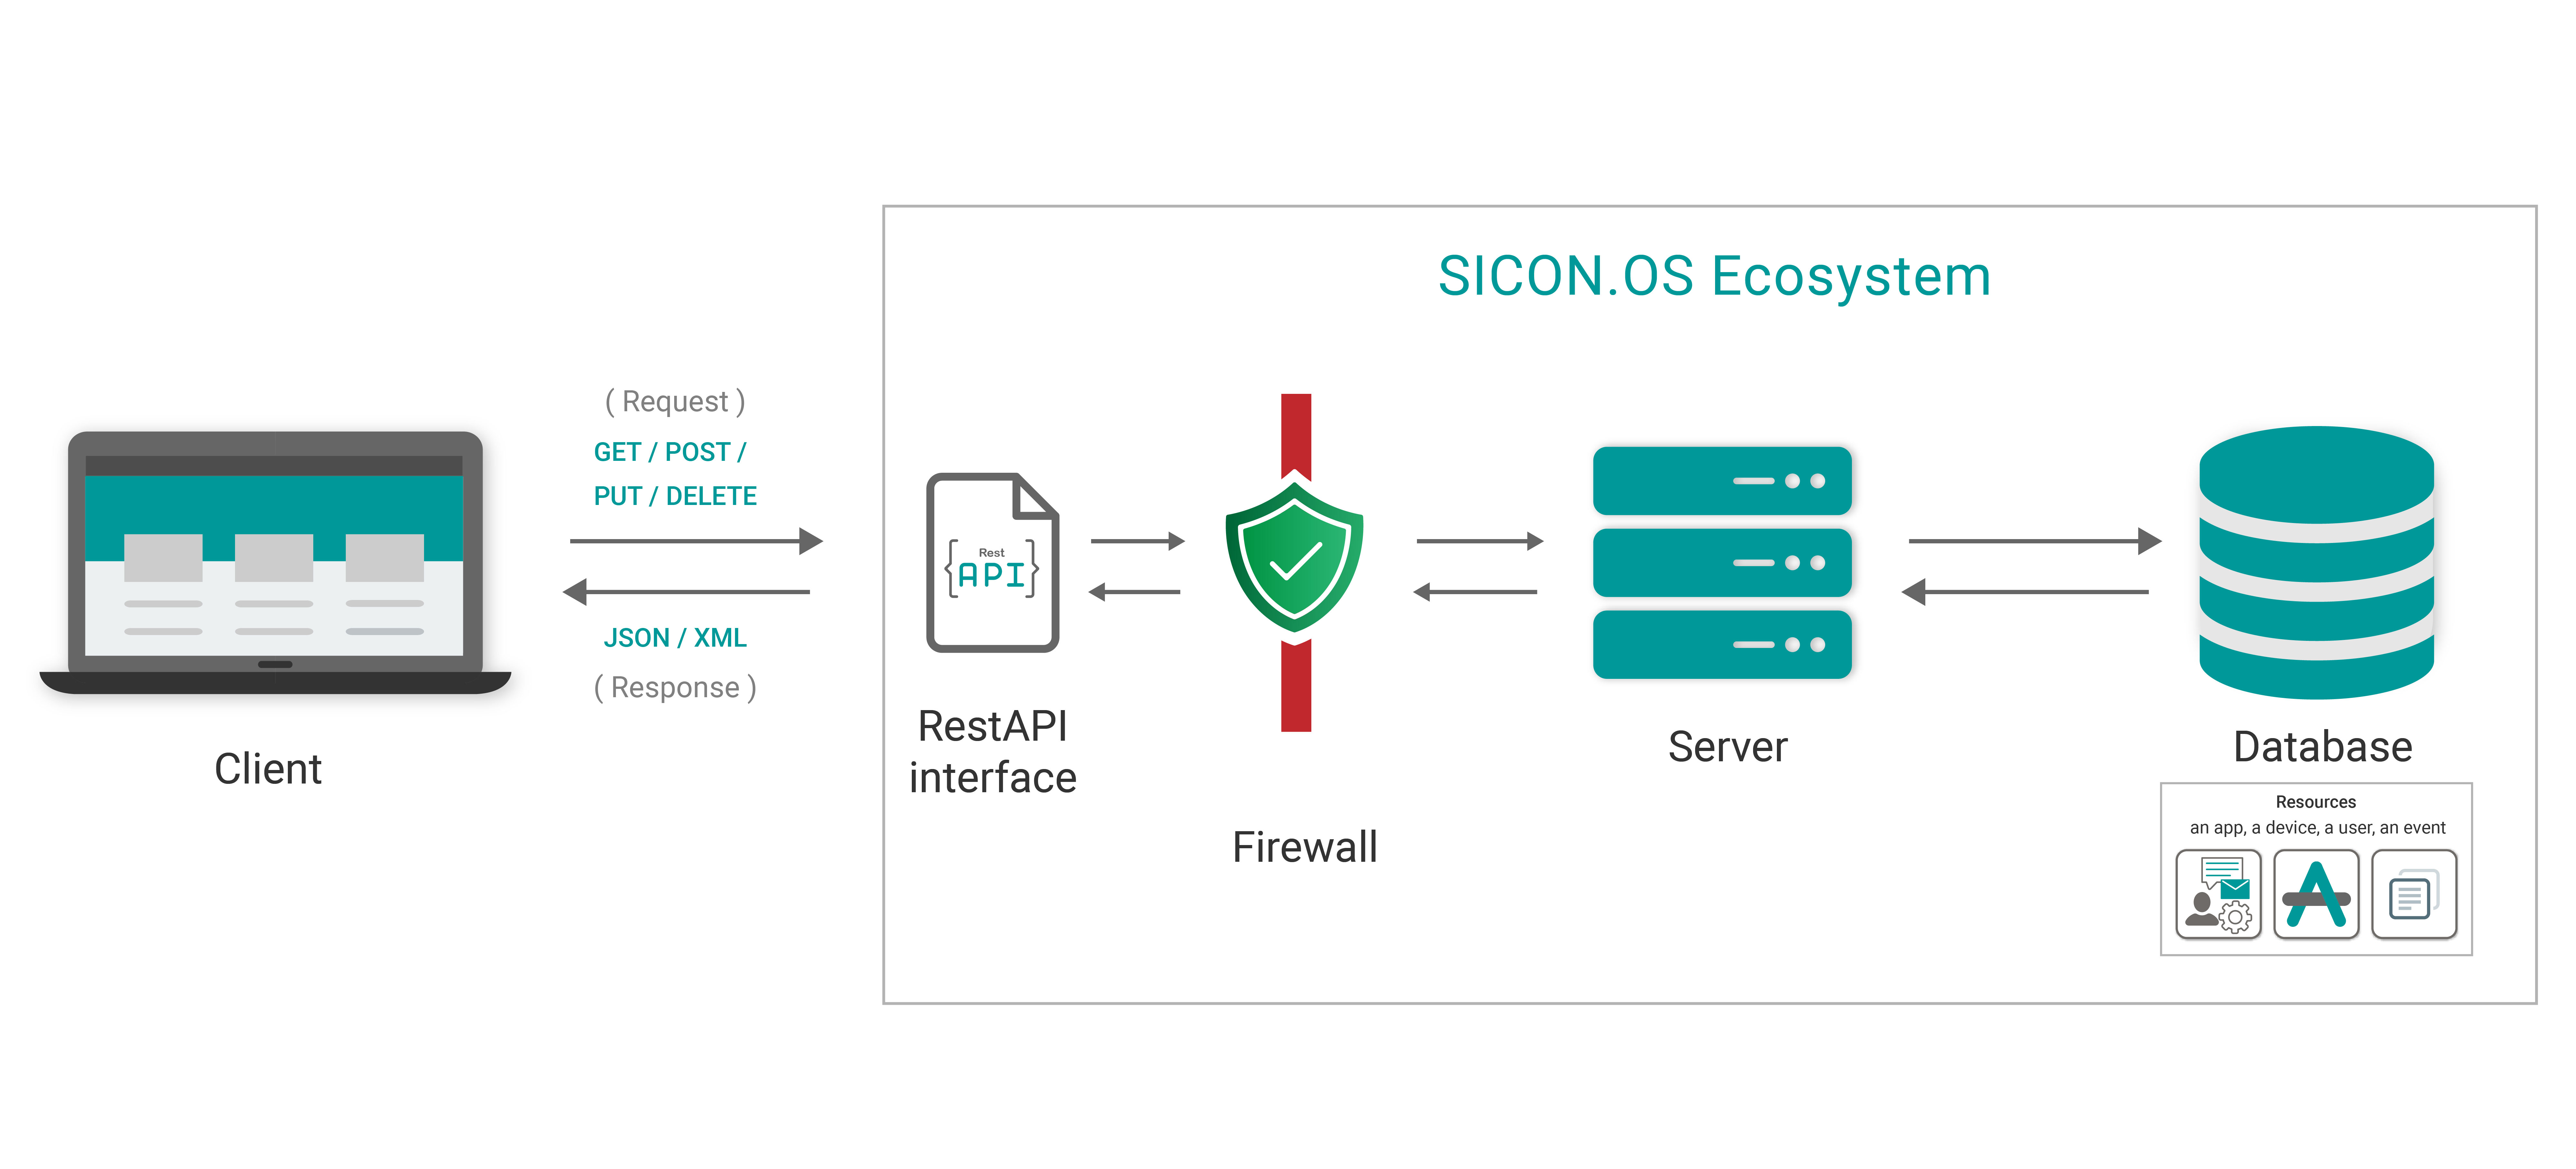
The SICON.OS REST API provides the current and historical state of devices. REST stands for REpresential State Transfer, describing a standard of how data should be read and modified from a HTTP web server.
It is a widely established and universal protocol that can be consumed from every kind of application, as long as it has a connection to the server.
The API is divided into categories. Examples are devices, events, reports or apps. Since many resources are related, they are also available as subpaths. For example if you want all events from device with ID 1, you can ask /devices/1/events or filter events based on their related device: /events?filter=DevID=1.
For this guide we will use these API endpoints:
/api/v1/auth/login- To gain access to the other secured API URLs/api/v1/devices- To retrieve a list of devices to get meta data likeProductNameandIDrequired for the report/api/v1/devices/:id/reporting- To get the actual report
The data format is JSON which consists of key-value pairs (objects) and arrays.
Our APIs typically offer two reading modes. A filterable list and a single view.

You can find a complete guide to our REST API in the documentation.
In this guide, we show how you can connect to the SICON.OS REST API to retrieve reporting data.
Reporting Data
A report is a collection of device data that gets stored to the SICON.OS database and published to the MQTT broker in short intervals. Depending on the device configuration, this can happen regularly or process triggered. For example, when a work cycle was completed.
Download the example
This guide uses Visual Studio to configure and run the project. You can download it for free from Microsoft.
We pre-built and combined all required sources in our git repository for you to include. It also contains a ready to run example.
If you do not have git installed, you can download a zip file from the git repository.
$ git clone https://github.com/GPS-GmbH/sicon-rest-example-cpp.gitOpen the sicon-rest-example-cpp.sln file. This opens the project in Visual Studio.
In the header section, all dependencies are included.
#include <iostream>
#include <stdlib.h>
#include <string>

#include "restclient-cpp/connection.h"
#include "restclient-cpp/restclient.h"
#include "nlohmann/json.hpp"
Beside the standard library, we also include a restclient and a json parser.
Restclient-cpp - A HTTP client that supports Restful HTTP Verbs like GET, POST, PUT and DELETE.
Nlohmanns JSON - A JSON parser library used to extract specific fields from the message mentioned above.
Linking the libraries
In order to access these external dependencies, they need to be linked to your project.
For better portability, these files should stay inside the project folder. But it is not required to have them at the same place, as long as these dependencies are available in your system.
First obtain the header and lib files and then drag and drop the following files to your header files section in Visual Studio.
connection.h
curl.h
curlver.h
easy.h
helpers.h
mprintf.h
multi.h
options.h
restclient.h
stdcheaders.h
system.h
typecheck-gcc.h
urlapi.h
version.h
restclient-cpp.lib
zlib.lib
json.hpp
Configuring The Connection
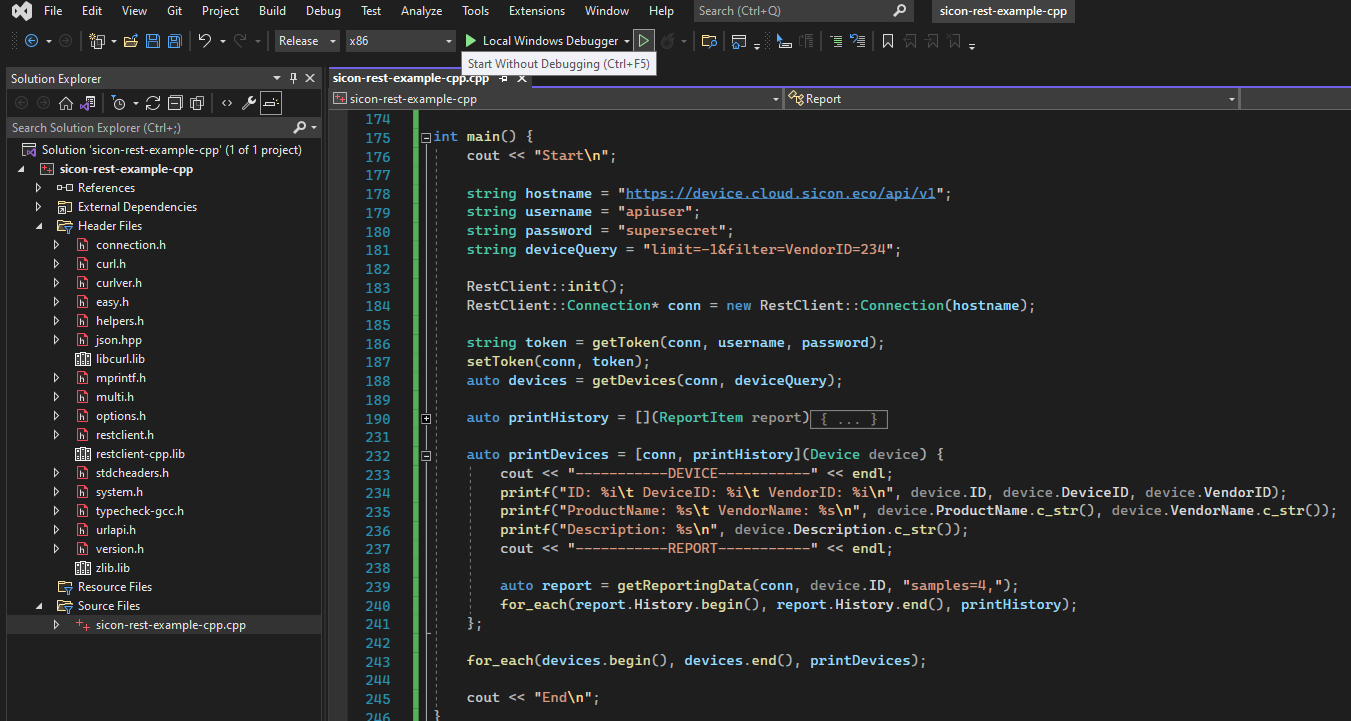
In the main function from line 178, the communication between the application and the server is configured.
    string hostname = "https://device.cloud.sicon.eco/api/v1";
    string username = "apiuser";
    string password = "supersecret";
    string deviceQuery = "limit=-1&filter=VendorID=234";
you can use an IP or a domain. Keep the api/v1 path appended, as it will be used for all REST API requests.
// Example for Domain
string hostname = "https://siconos-2033.local/api/v1"
// Or alternatively IP Address - use the SICON.OS IT or IIT adress
string hostname = "https://192.168.77.10/api/v1"
Username and Password
It is important to create or choose a user with a role that is able to read device data. In your SICON.OS installation, you can navigate to Settings → Users → Roles to get an overview. In the example below, the user must be an Optimizer, Setter or Administrator.

Logging in
In order to communicate with the rest of the APIs, we first need to retrieve a token. This can be then inserted in the other REST API calls as header.
string getToken(RestClient::Connection* conn, string username, string password) {
    conn->AppendHeader("Content-Type", "application/json");
    RestClient::Response response = conn->post(
        "/auth/login",
        "{\"User\": \"" + username + "\", \"Password\": \"" + password + "\"}"
    );
    auto responseBody = json::parse(response.body.c_str());
    string token = responseBody.at("token");
    return token;
}
Here we POST JSON with User and Password to https://device.cloud.sicon.eco/api/v1/auth/login to retrieve this response.
{
    "user": {
        "ID": 7,
        "User": "apiuser",
        "Firstname": "apiuser",
        "Lastname": "apiuser",
        "Email": "api@user.de",
        "System": 0,
        "Role": {
            "ID": 7,
            "Name": "Operator",
            "System": 0,
            "Description": "Read only of production data"
        },
        "Privileges": [
            "apps_sicon_view",
            "apps_sicon_node",
            "device_tree_read"
        ]
    },
    "token": "eyJhbGciOiJIUzI1NiIsInR5cCI6IkpXVCJ9.eyJJRCI6NywiVXNlciI6ImFwaXVzZXIiLCJGaXJzdG5hbWUiOiJhcGl1c2VyIiwiTGFzdG5hbWUiOiJhcGl1c2VyIiwiRW1haWwiOiJhcGlAdXNlci5kZSIsIlN5c3RlbSI6MCwiUm9sZSI6eyJJRCI6NywiTmFtZSI6Ik9wZXJhdG9yIiwiU3lzdGVtIjowLCJEZXNjcmlwdGlvbiI6IlJlYWQgb25seSBvZiBwcm9kdWN0aW9uIGRhdGEifSwiUHJpdmlsZWdlcyI6WyJhcHBzX3NpY29uX3ZpZXciLCJhcHBzX3NpY29uX25vZGUiLCJkZXZpY2VfdHJlZV9yZWFkIl0sImlhdCI6MTY0MzI5Mjk0NX0.sqS-r3H2b6wko1StWEtW0ZseTXZ62bx7Sam_pI1RAPs"
}
We pick the token and save it for later.
Decide which Devices to get
The REST API endpoint for reading a list of devices can be configured to e.g. only list Schmalz devices (filter=VendorID=234) or only maximum 10 devices (limit=10).
This is what the deviceQuery defines.
string deviceQuery = "limit=-1&filter=VendorID=234";The SICON.OS REST API reference guide goes into more detail what filter possibilities there are.
Settings are chained using ampersand (&) according to the query parameter standard, which is a part of the URL.
For pagination, you can use limit=10 to define how many items are fetched. If you retrieve devices in batches, you can retrieve the second page by using offset=10. For our example, we fetch all devices by setting limit to -1.
The filter property defines which devices to fetch based on the criteria defined. You can use properties from the list below and connect them with commas. (e.g. only retrieve devices from vendor J. Schmalz GmbH , which are connected: filter=VendorID=234,ConnectionState=1)
Here are the most relevant properties needed for third party apps.
Property | Example Value | Type | Description |
|---|---|---|---|
ID | 47 | Number (positive) | Unique identifier of the device throughout SICON.OS for relational data |
Active | 1 | Number (0 or 1) | Whether to retrieve sensor data or not |
AncestorMainDevID | 4 | Number | ID of the main device the device is connected to |
AssetID | “zht8124s” | String | |
LocationTag | “ | ||
LocationPos | |||
ConnectionState | 1 | Number (0 or 1) | Whether the physical device is connected or not |
CreatedOn | "2021-12-27T14:57:57.000Z" | String (ISO Date) | First time the device was registered with SICON.OS |
Description | "SICON.OS onCloud" | String | Product description |
DeviceID | 990001 | Number | IO-Link specific ID |
VendorID | 100000 | Number | IO-Link specific ID |
VendorName | “J. Schmalz GmbH” | String | |
DeviceStatus | 0 | Number | numerical representation of the device status (0=ok, 4=defect/fault) |
Name | Custom name | ||
PictureFileName | "sicon.os-onCloud.png" | String | Can be accessed from your SICON.OS installation like so: https://device.cloud.sicon.eco/docs/img/ |
ProductID | "10-21-3030" | String | |
ProductName | "SICON.OS onCloud" | String | |
SerialNumber | “1001022” | String | |
UID | "c02fce1bc708" | String | Unique Identifier across all SICON.OS installations |
This is the code used to retrieve the list of devices.
vector<Device> getDevices(RestClient::Connection* conn, string query) {
    RestClient::Response response = conn->get("/hardware?" + query);
    json responseBody = json::parse(response.body.c_str());
    Devices devices = responseBody;
    return devices.devices;
}
Making the actual REST API call, we retrieve and parse the response which has this structure. Your actual response will include all properties explained above.
{
	"offset": 0,
	"limit": 30,
	"rowCount": 8,
	"pageCount": 1,
	"items": [
		{
			"ID": 0,
			"Name": "SICON.OS onCloud"
		},
		{
			"ID": 157,
			"Name": "Dauerversuch: CobotMini"
		}
	]
}
We loop through the list of items and output some information:
    auto printDevices = [conn](Device device) {
        cout << "-----------DEVICE-----------" << endl;
        printf("ID: %i\t DeviceID: %i\t VendorID: %i\n", device.ID, device.DeviceID, device.VendorID);
        printf("ProductName: %s\t VendorName: %s\n", device.ProductName.c_str(), device.VendorName.c_str());
        printf("Description: %s\n", device.Description.c_str());
    };

    for_each(devices.begin(), devices.end(), printDevices);
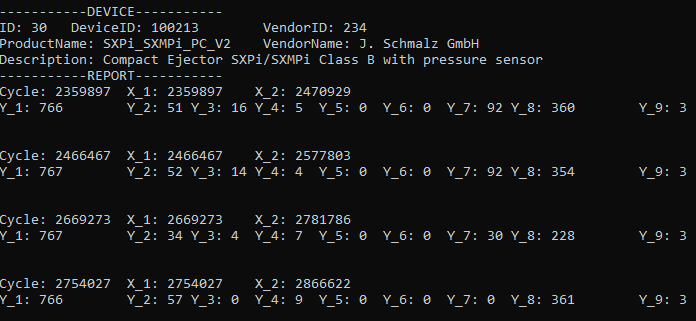
This is the intermediate result of printing a device to the terminal:
-----------DEVICE-----------
ID: 36   DeviceID: 100213        VendorID: 234
ProductName: SXPi_SXMPi_PC_V2    VendorName: J. Schmalz GmbH
Description: Compact Ejector SXPi/SXMPi Class B with pressure sensor
Retrieving and Printing Reporting Data
Finally we retrieve the reporting data with the following function:
Report getReportingData(RestClient::Connection* conn, int id, string query) {
    RestClient::Response response = conn->get("/devices/" + to_string(id) + "/reporting?" + query);
    json responseBody = json::parse(response.body.c_str());
    Report report = responseBody;
    return report;
}
At the same time, we extend the device print loop with calling getReportingData
        auto report = getReportingData(conn, device.ID, "samples=4,");
        for_each(report.History.begin(), report.History.end(), printHistory);
Save and compile the project
Save the file. Afterwards start the debugger in the toolbar. Alternatively you can press CTRL+F5.
Make sure to choose x86 before when compiling the project.

Final Result
