
Setup SICON.Toolbox App
1. Setup via the SICON.Setup app
At the beginning of the setup process, your SICON.PLUG should pulse blue. If this is not the case, please RESET the device to its factory settings.
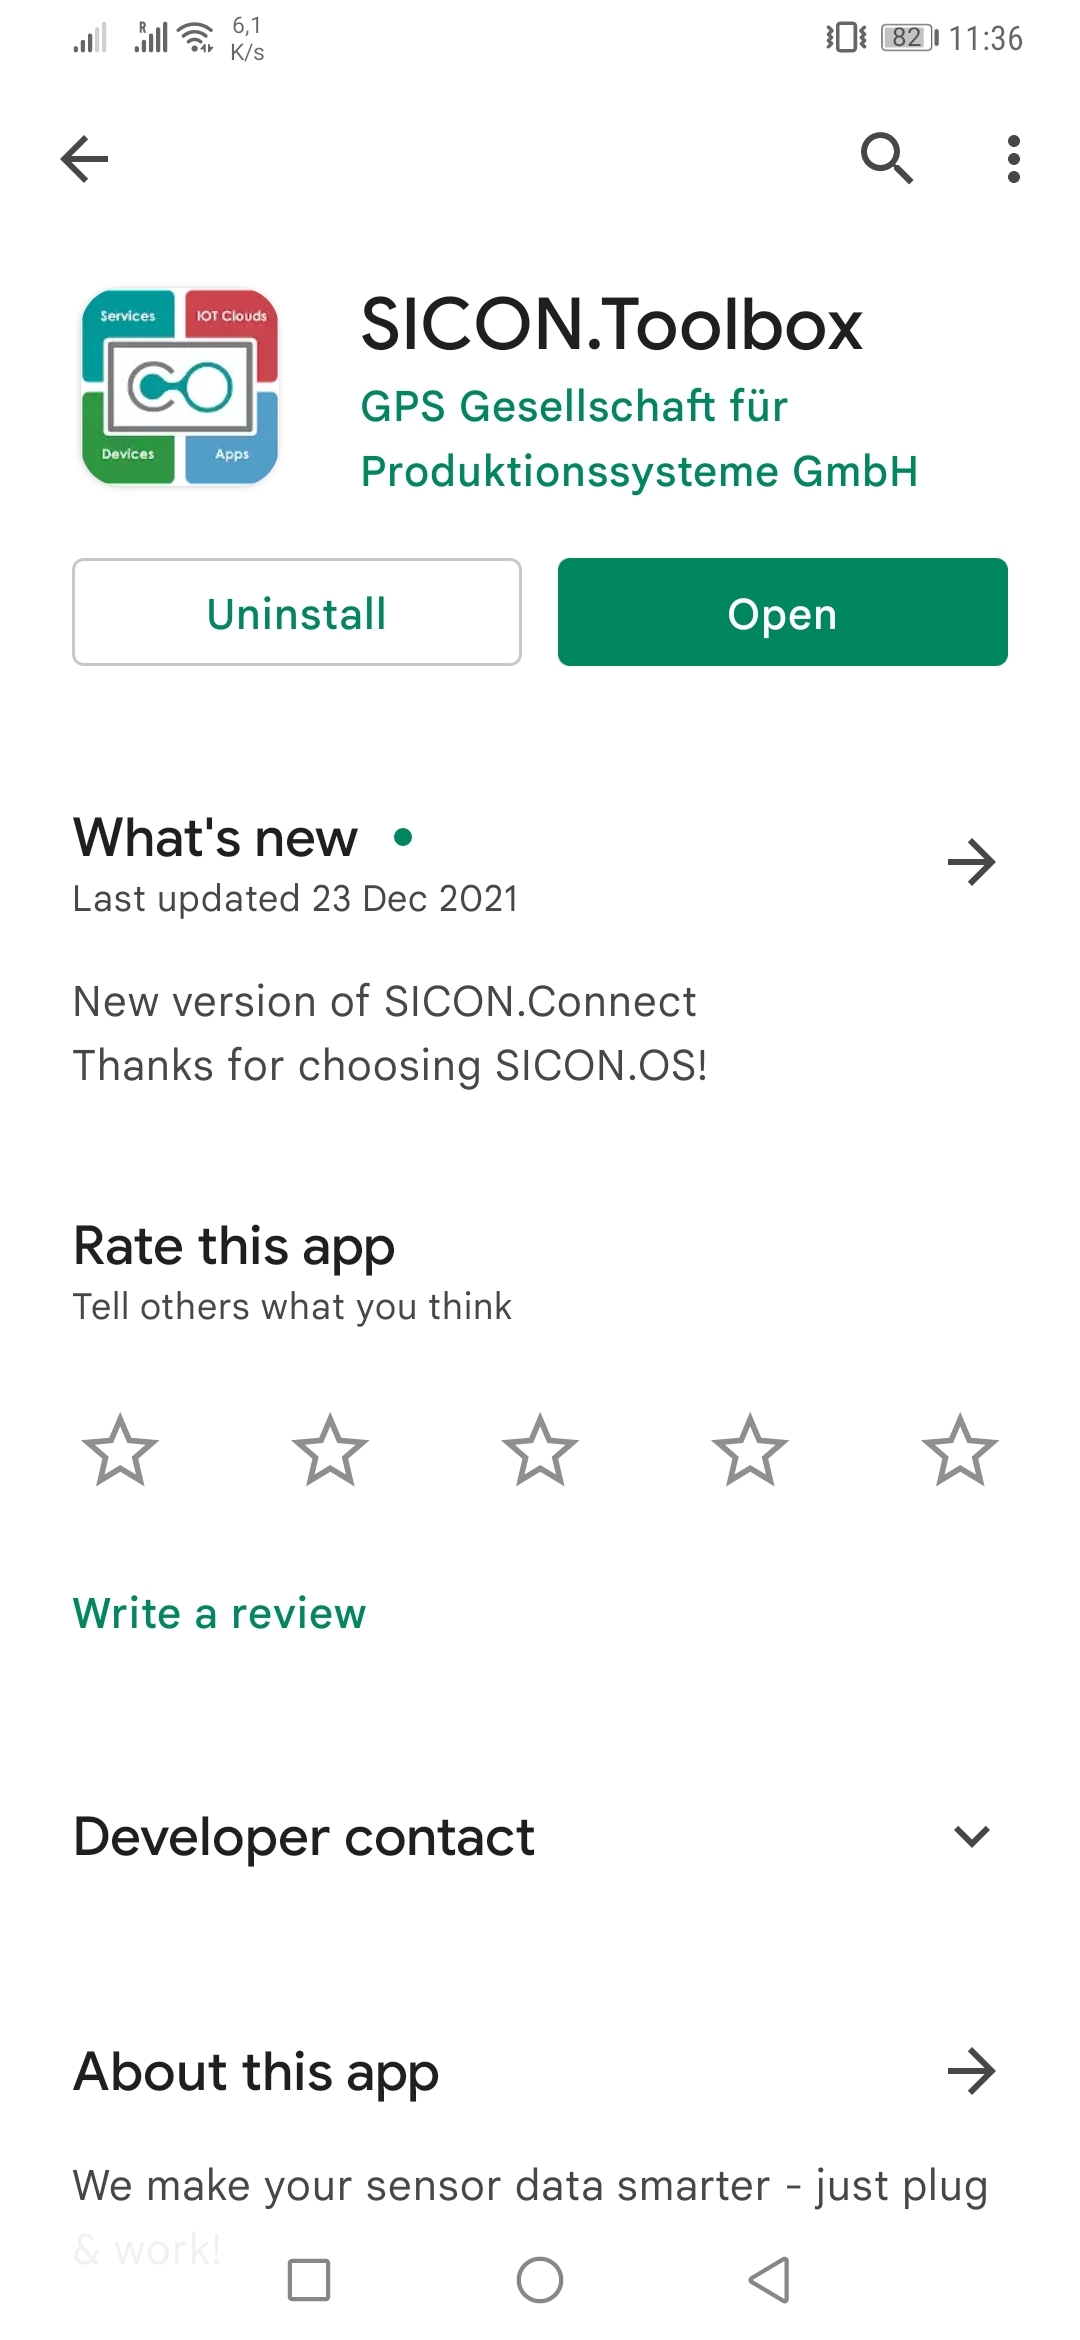
1. Download and install
1.1. Download and install the SICON.Toolbox app for free:
Platform | Link / Installation File |
|---|---|
Android | |
iOS | |
Windows | |
MacOS |
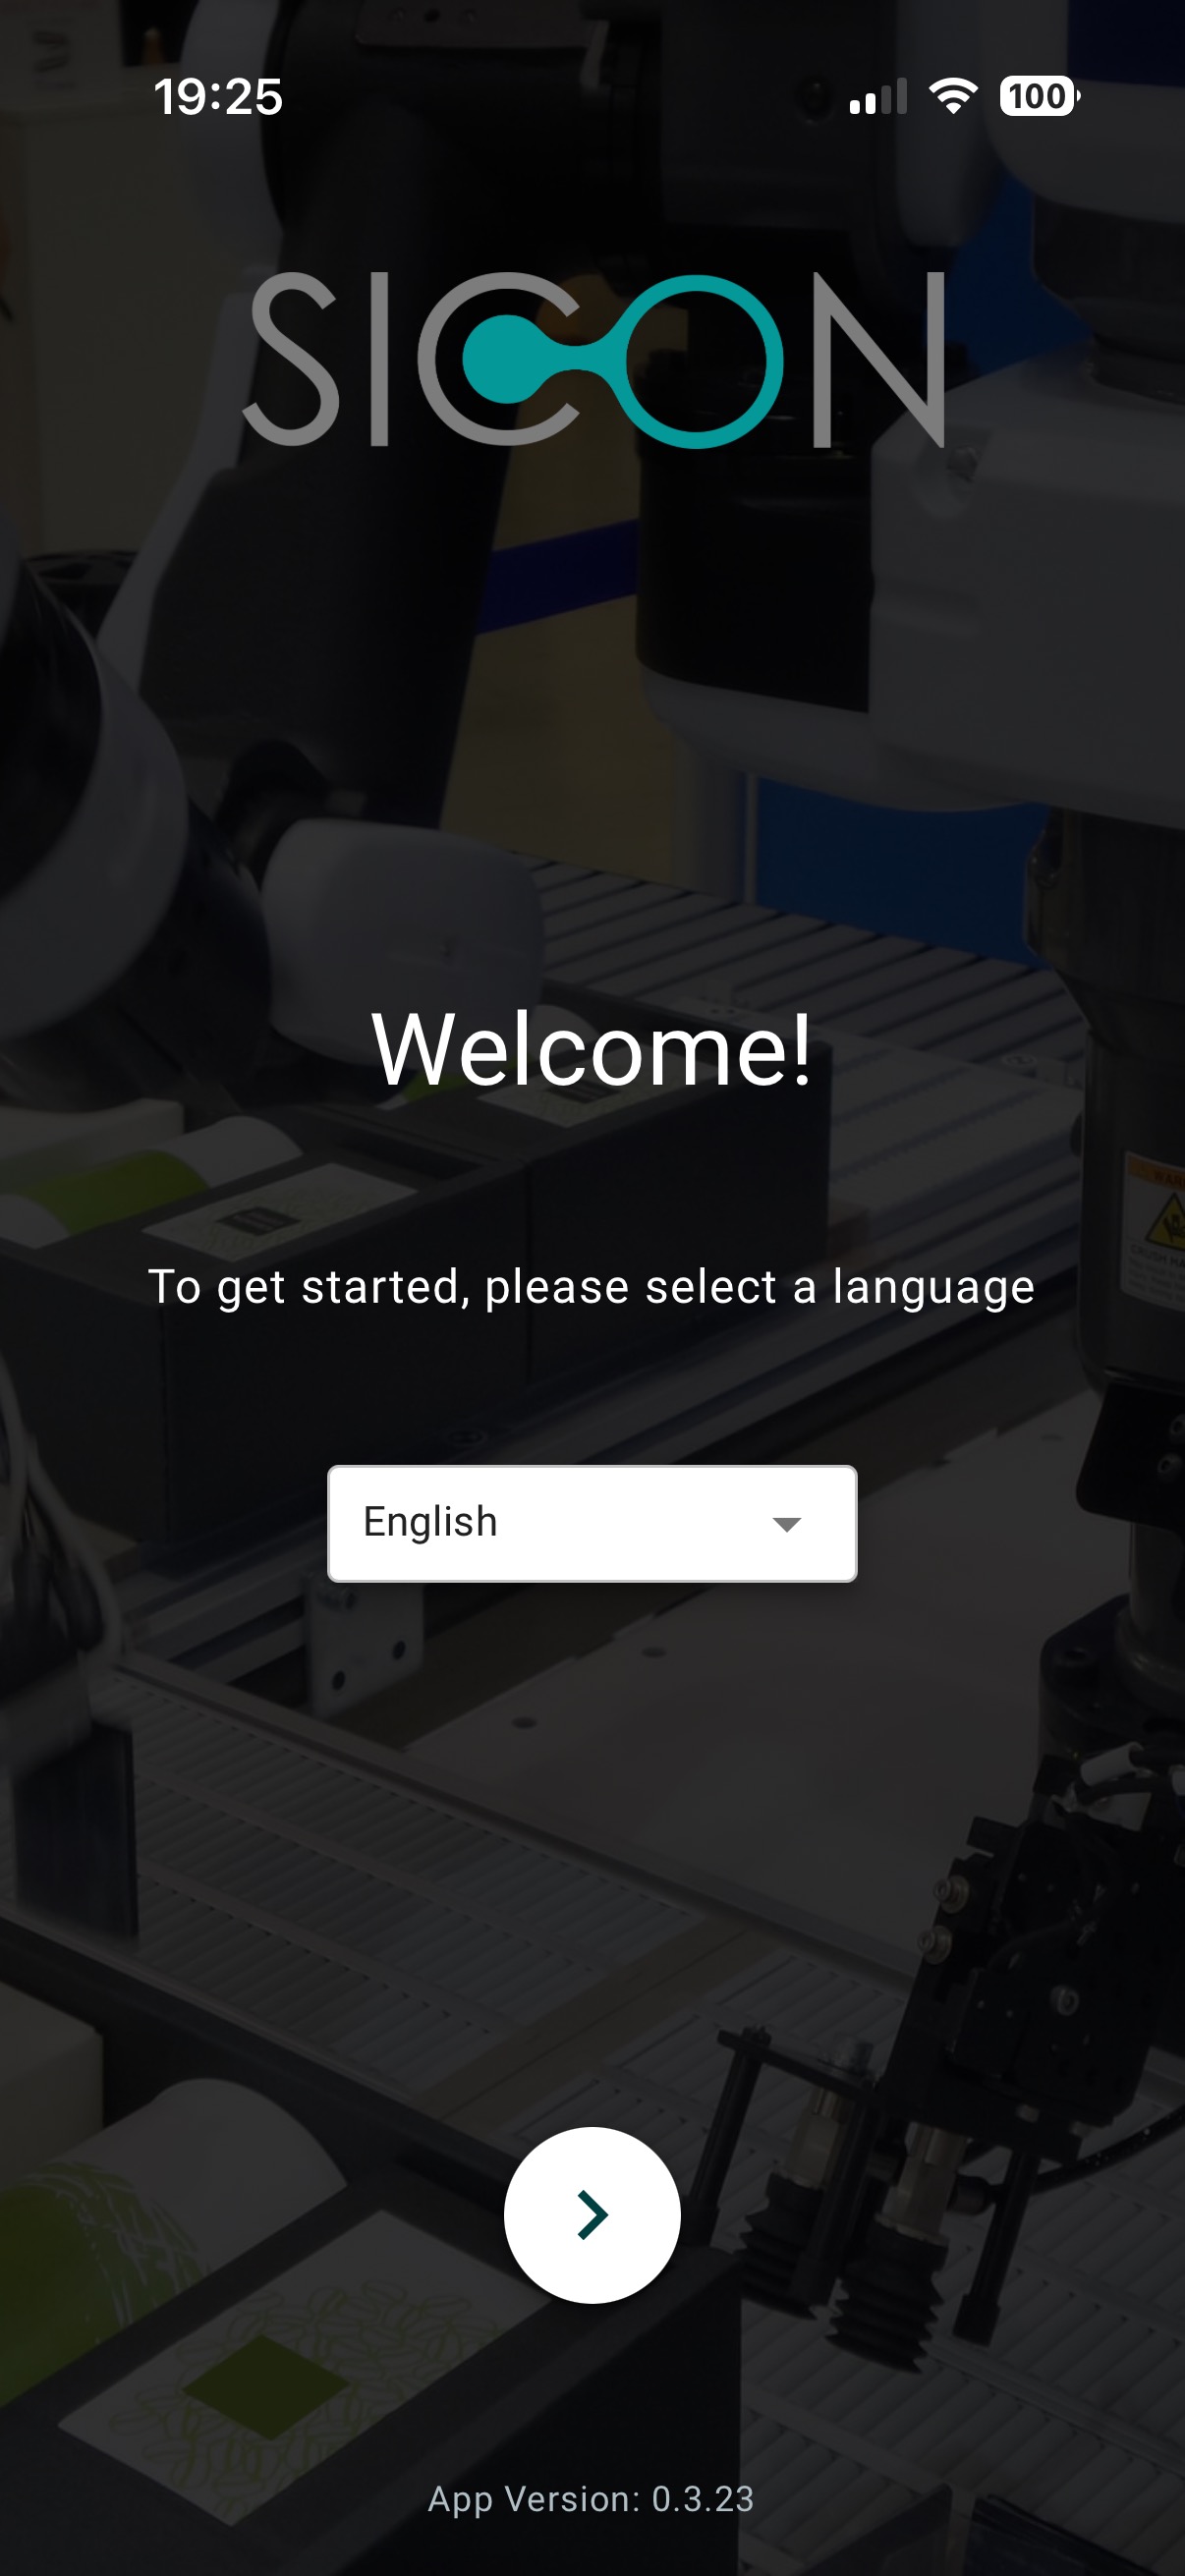
1.2 Open the app and select your preferred language.
Make sure that your smartphone or tablet is on the same network as your SICON.OS box. If you have a SICON Cloud, please make sure that you have an internet connection.
1.3 Now enter the IP address or if you have a cloud, then enter URL of the cloud into the app. i.e my.cloud.sicon.eco
.jpg?inst-v=f2dae426-6731-46dd-862f-09b2903b122f)
Or you can SCAN THE QR-CODE from the cloud.
You can also choose SKIP TO SETUP option, if you want to setup a single Plug. (We recommend to use normal Login process if you have to setup multiple plugs)
1.4 Next, you should be able to Sign in to SICON.OS with your respective user account. Enter your Username & Password to sign in.
-20260304-075954.jpg?inst-v=f2dae426-6731-46dd-862f-09b2903b122f)
1.5 Welcome to the SICON.Toolbox dashboard.
Here you will see the connected devices, disconnected devices, OEE performance data. The green “Link”  symbol show that the Toolbox app is connected to the SICON.OS
.jpg?inst-v=f2dae426-6731-46dd-862f-09b2903b122f)
1.6 Go to the Hamburger menu to open the Side bar panel. You will see the following menu:
Dashboard
Add device
Simulate device
App info
Settings
Click on ADD DEVICE.
.jpg?inst-v=f2dae426-6731-46dd-862f-09b2903b122f)
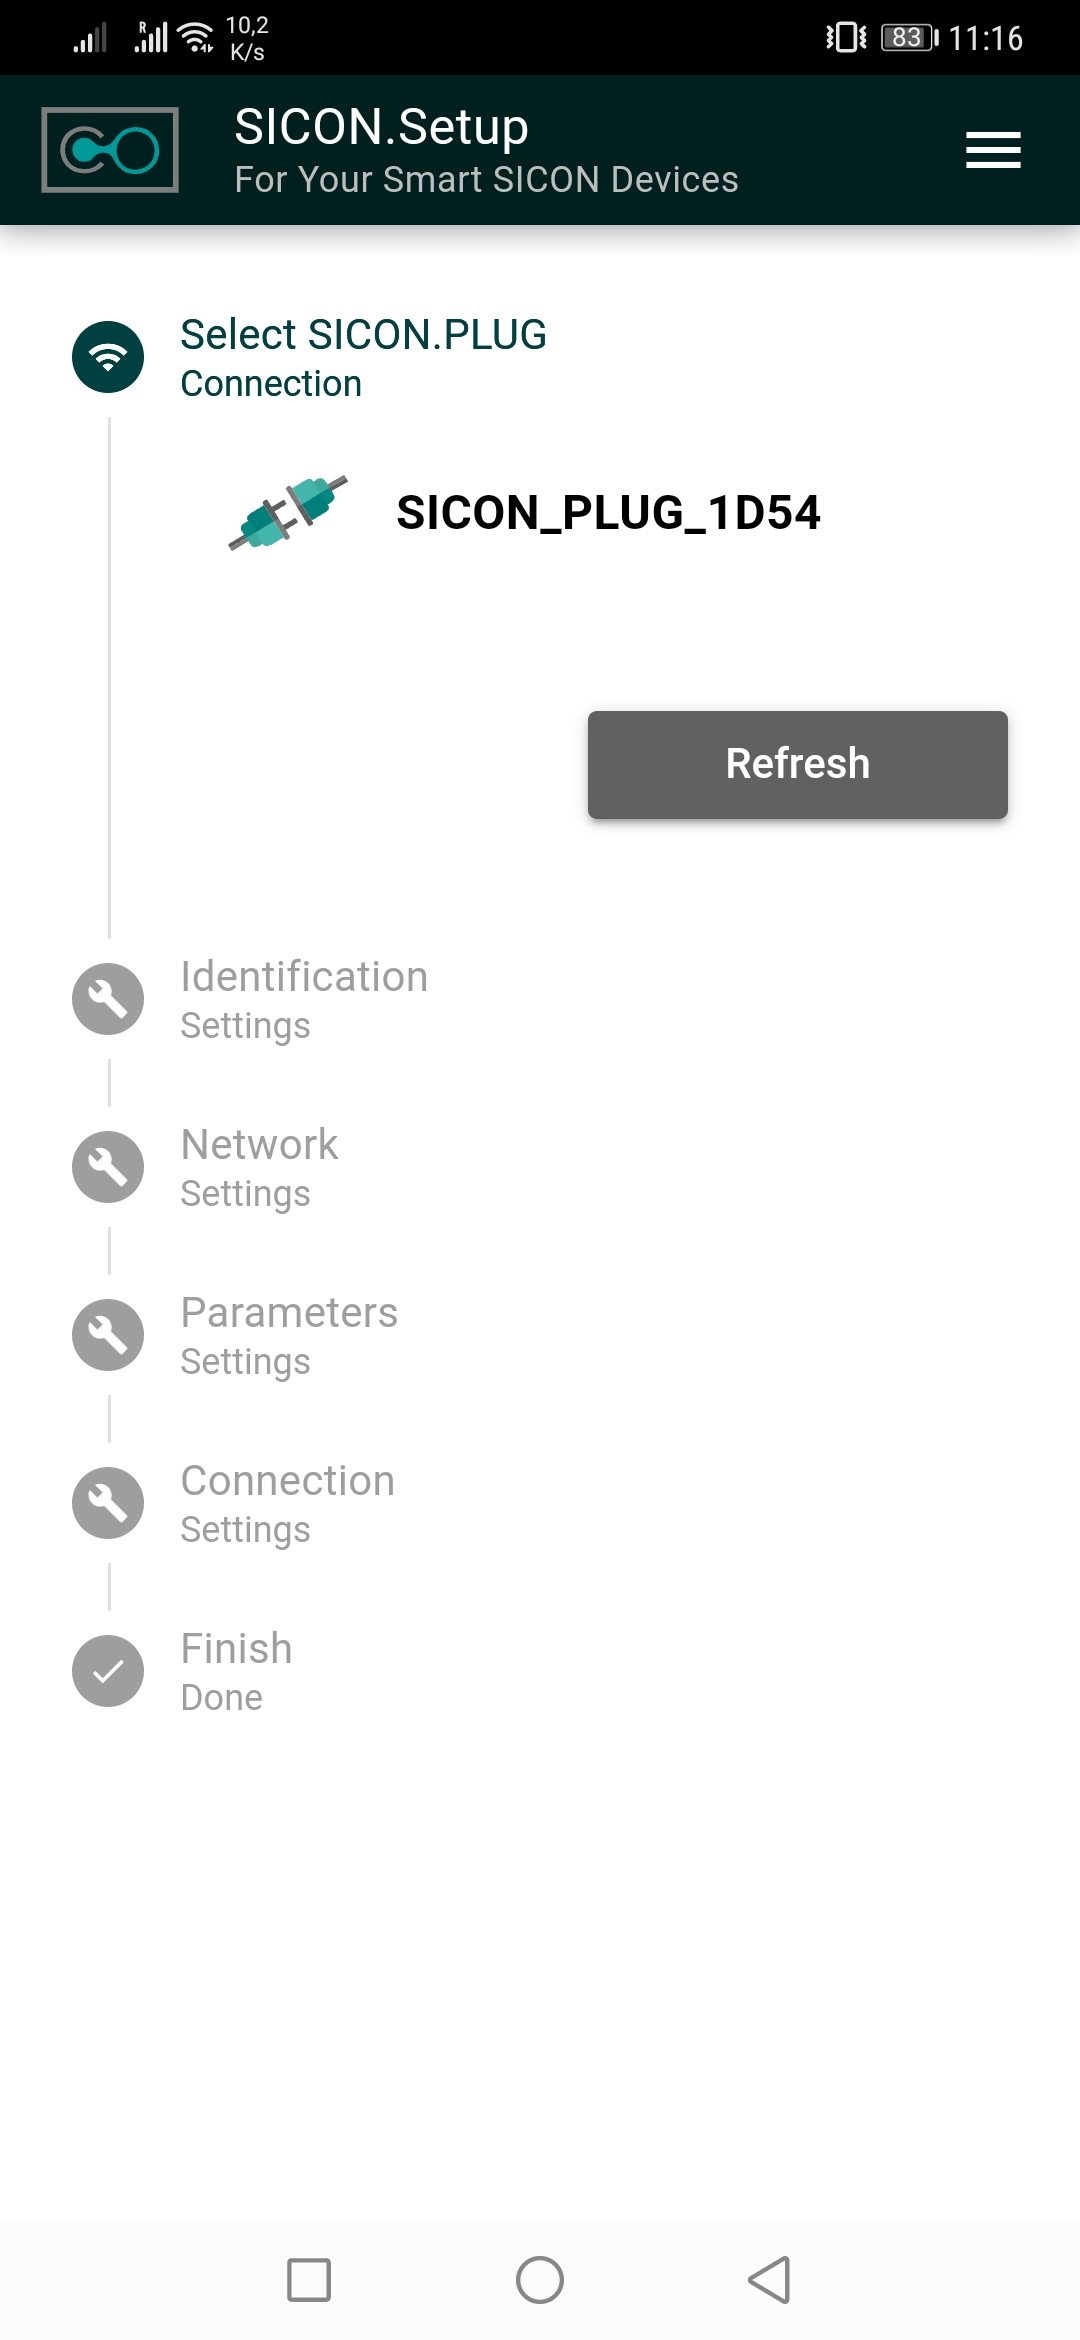
2. Configuring the SICON.PLUG
To configure the SICON.PLUG, you need to follow the following steps one by one:
Select the SICON.PLUG / Connect to the PLUG
Identification
Network
Parameters
Calibration (Only for selected PLUGs)
Setup Wizard (Only for selected PLUGs)
Connection
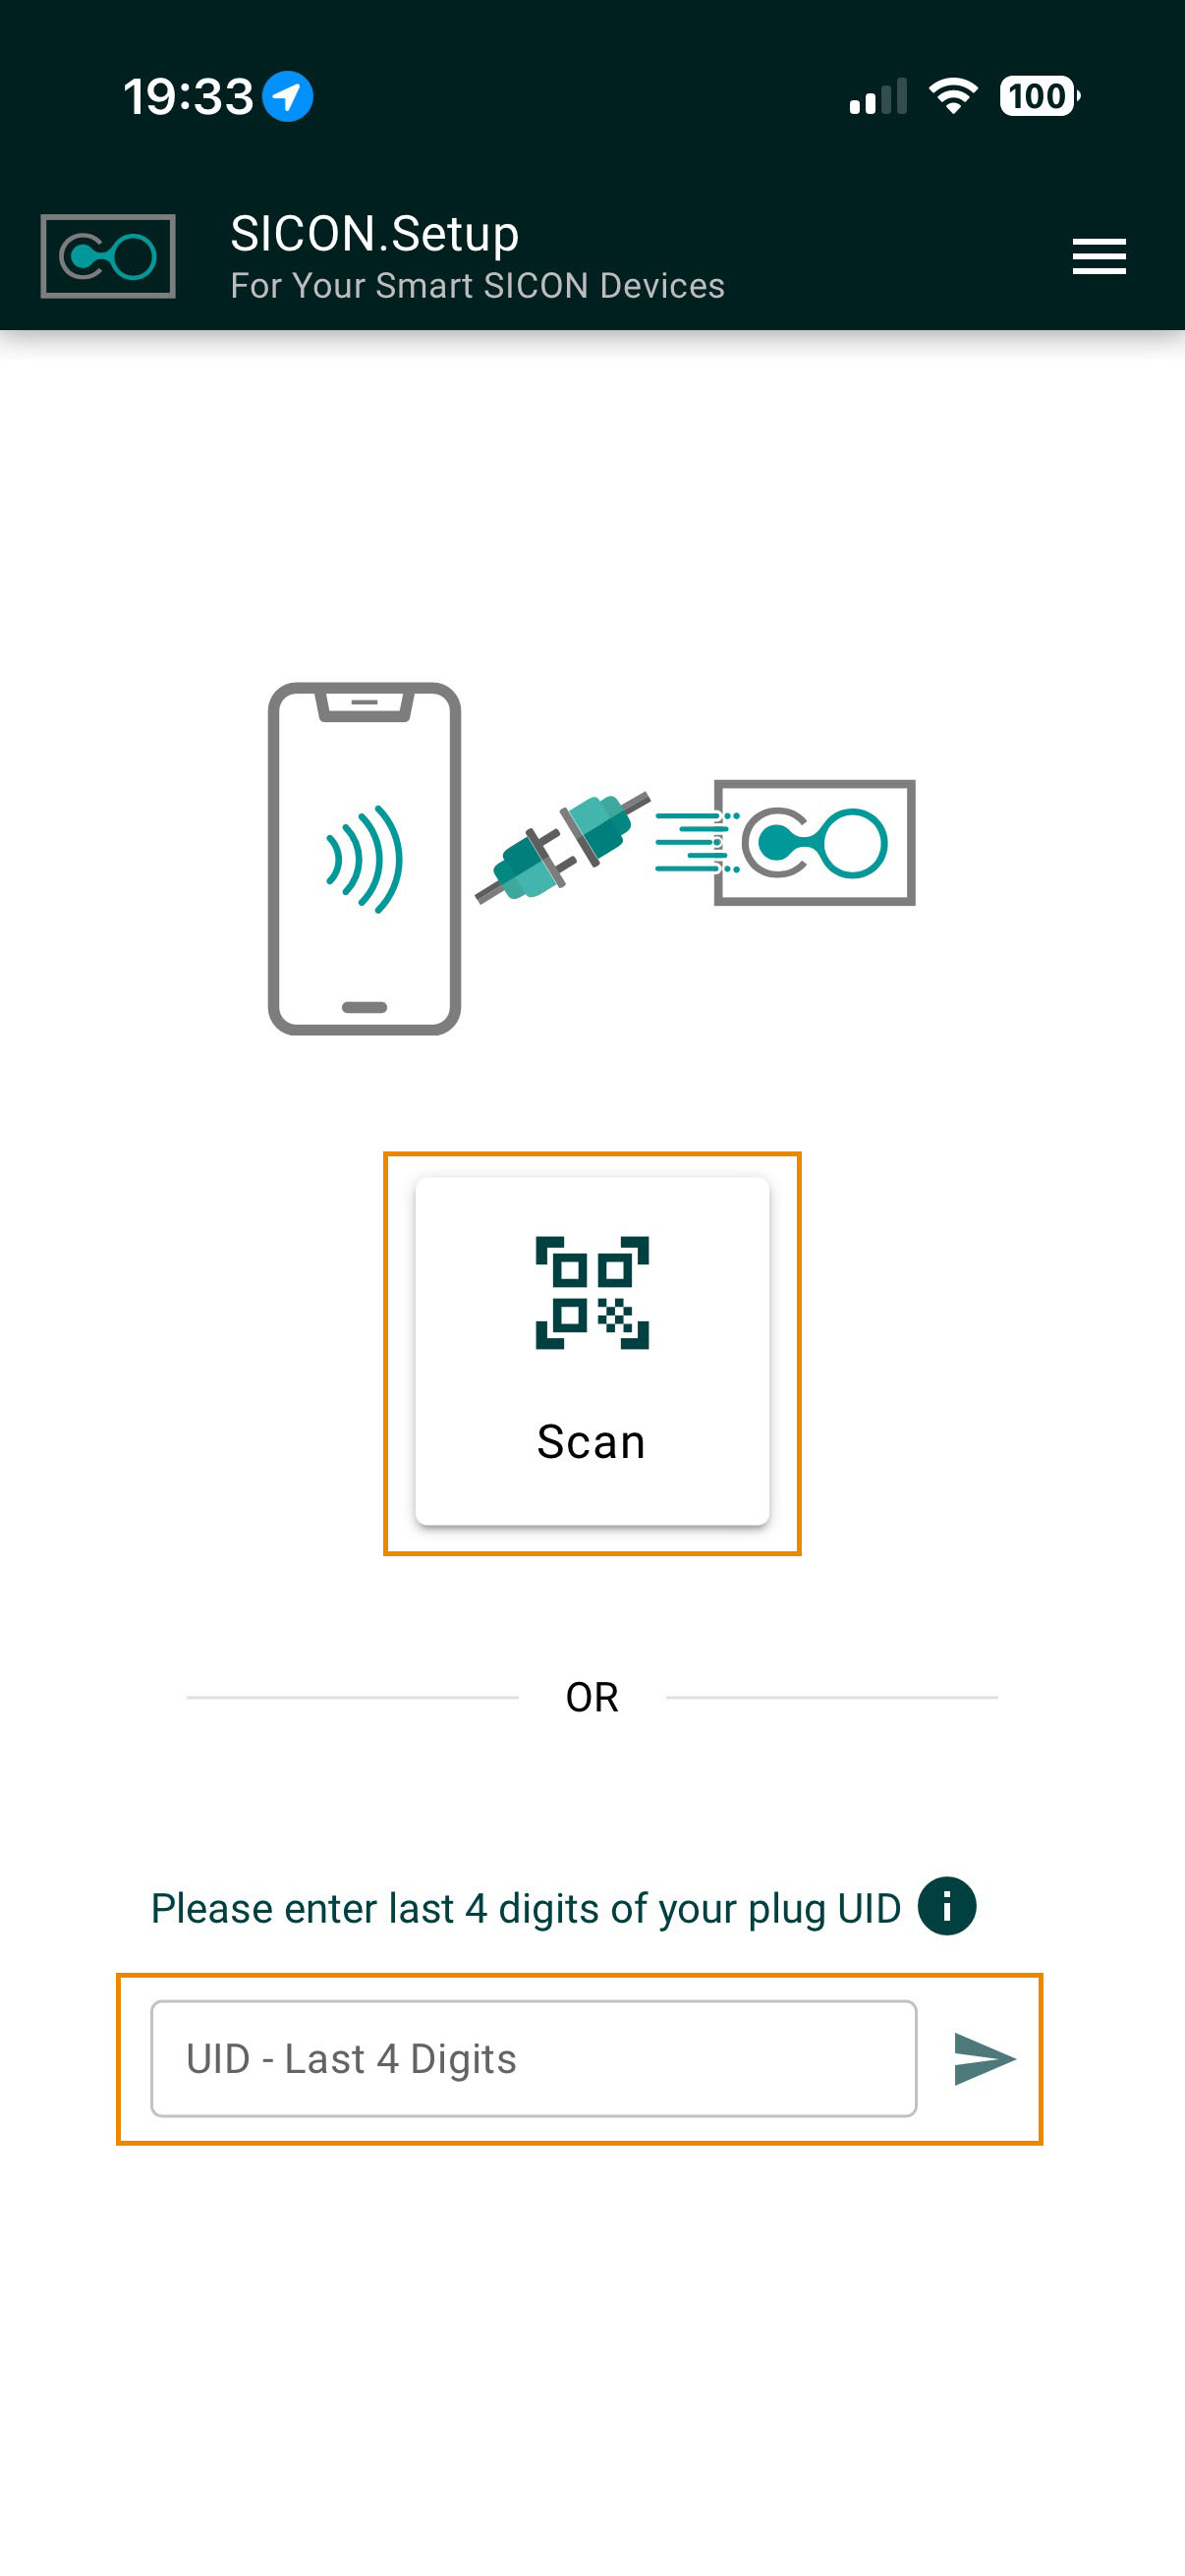
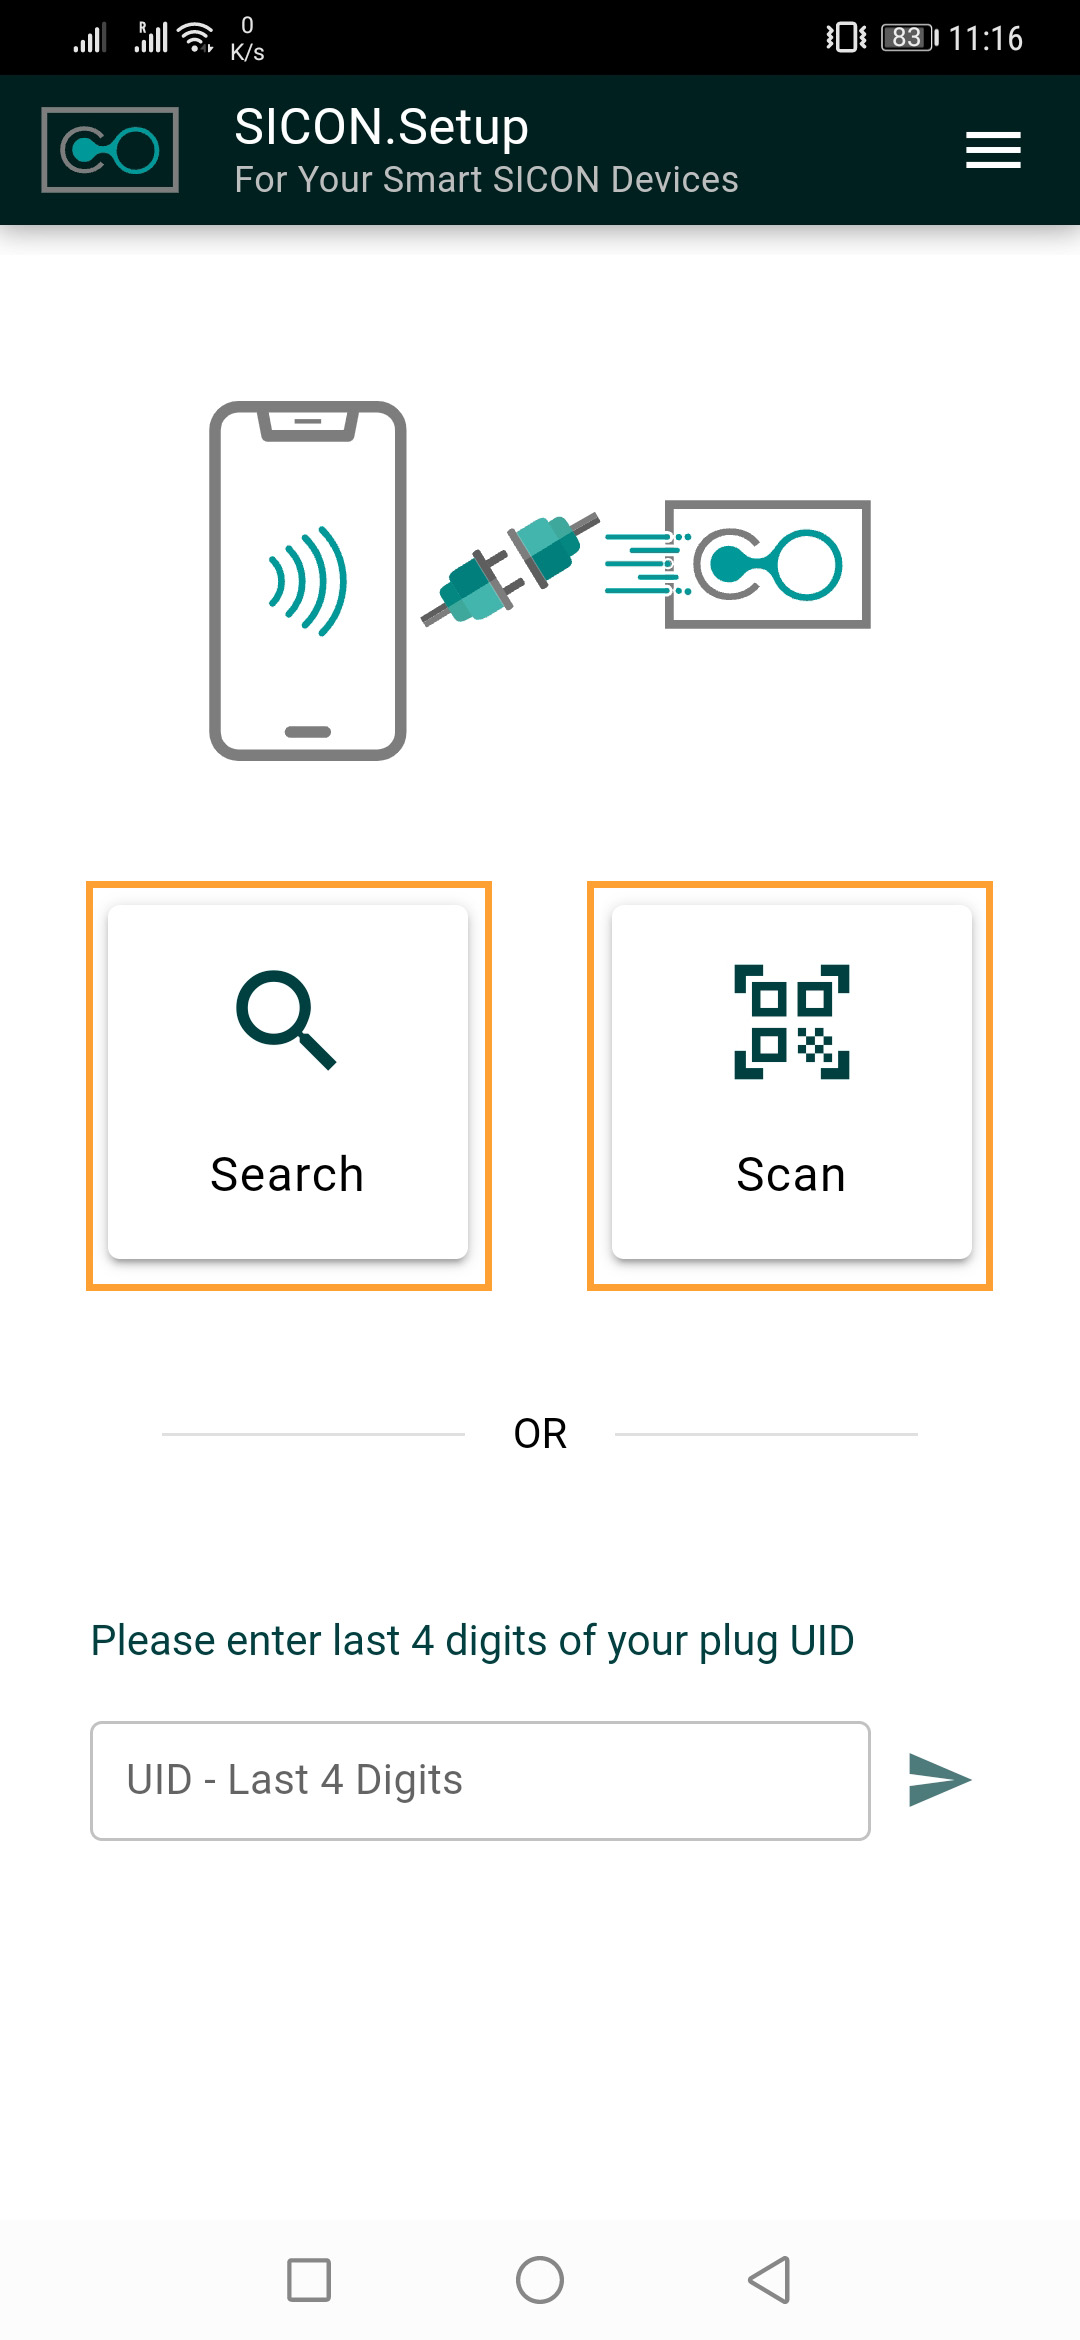
2.1 Select the SICON.PLUG Device:
To add a SICON.PLUG device, you can select one of the following options:
Search → This option automatically finds the nearby Plugs.
This option is only available for android users currently.
Scan → With this option, you can scan the QR-Code which is located at the back of the Plug.
Manual → Here you have to enter the last 4 characters of the Plug UID which is located at the back of the Plug.
For iOS
For Android
Example: Scan feature
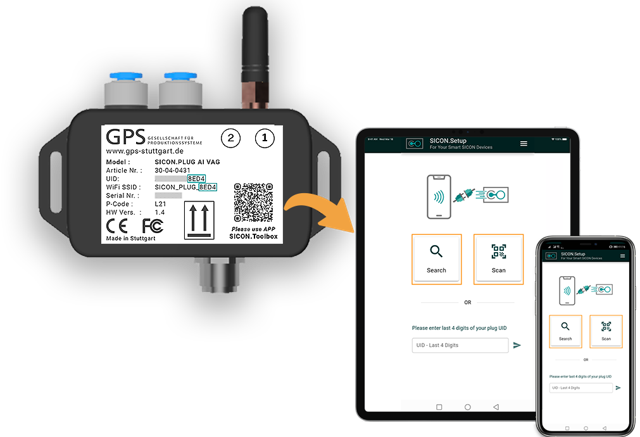
Select the SICON.PLUG to be configured. If several devices are displayed, you can identify the correct SICON.PLUG via the label. Here you will find the Unique ID, which is unique worldwide. The last four characters of the unique ID are also displayed for the listed SICON.PLUGs in the app.
2.2 Identification:
Click on the BLINK BUTTON to locate your Plug and to make sure that you have selected the correct SICON.PLUG. By pressing this Blink button, all LEDs of the selected device light up white and clearly identify it. If you agree with your selection, you can jump to the next configuration step by pressing NEXT .
.jpg?inst-v=f2dae426-6731-46dd-862f-09b2903b122f)
.jpg?inst-v=f2dae426-6731-46dd-862f-09b2903b122f)
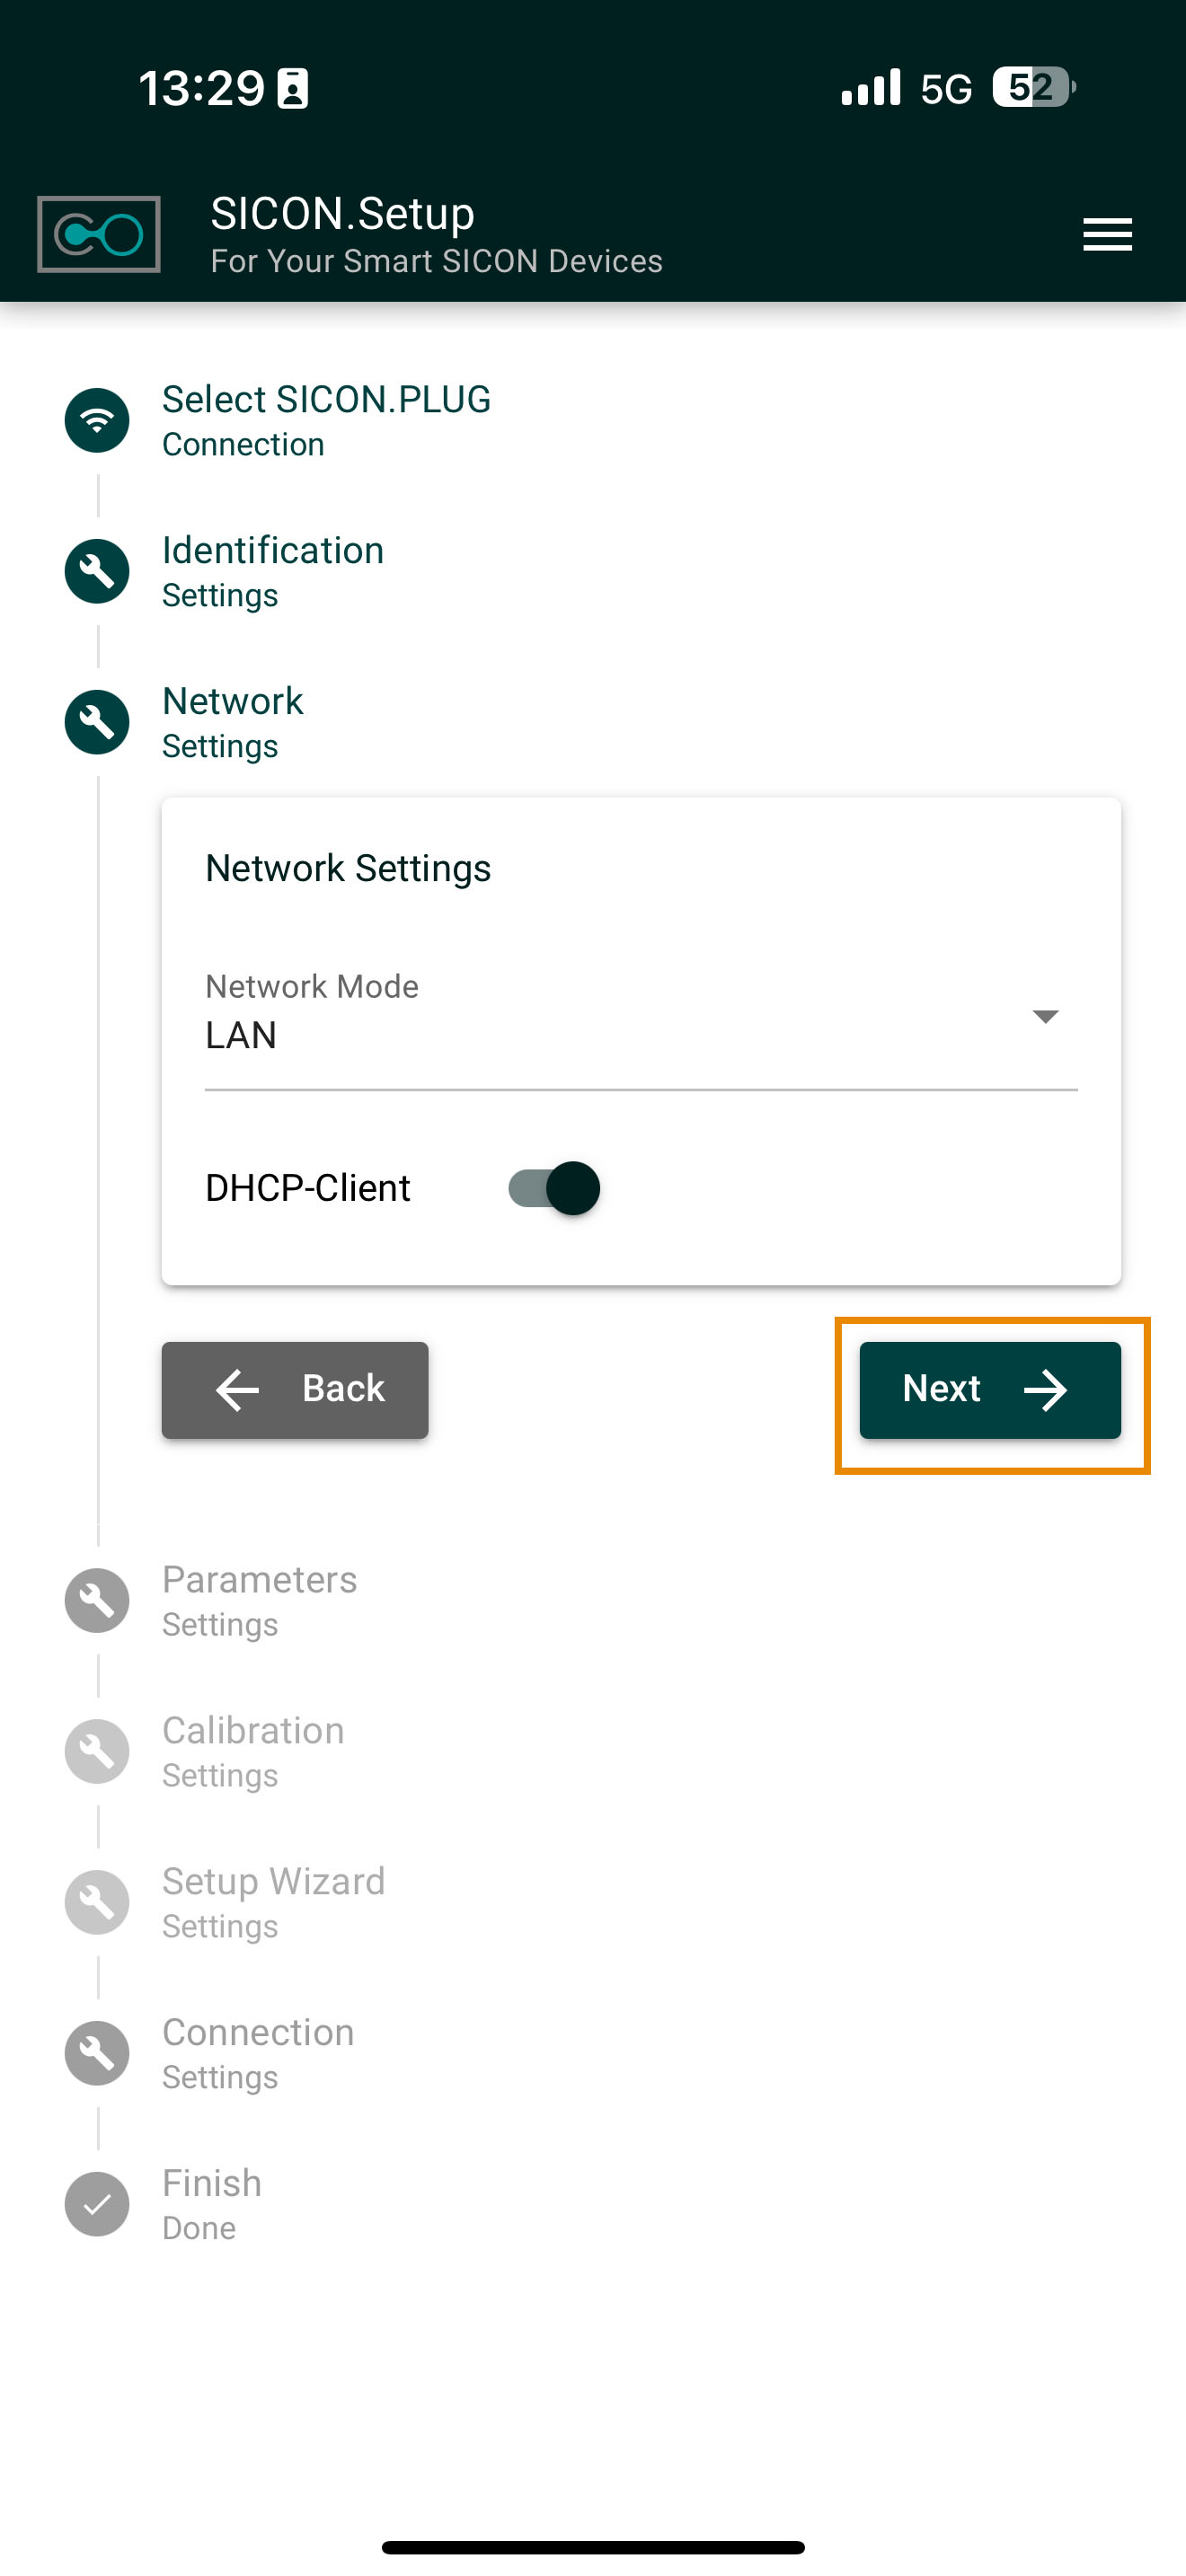
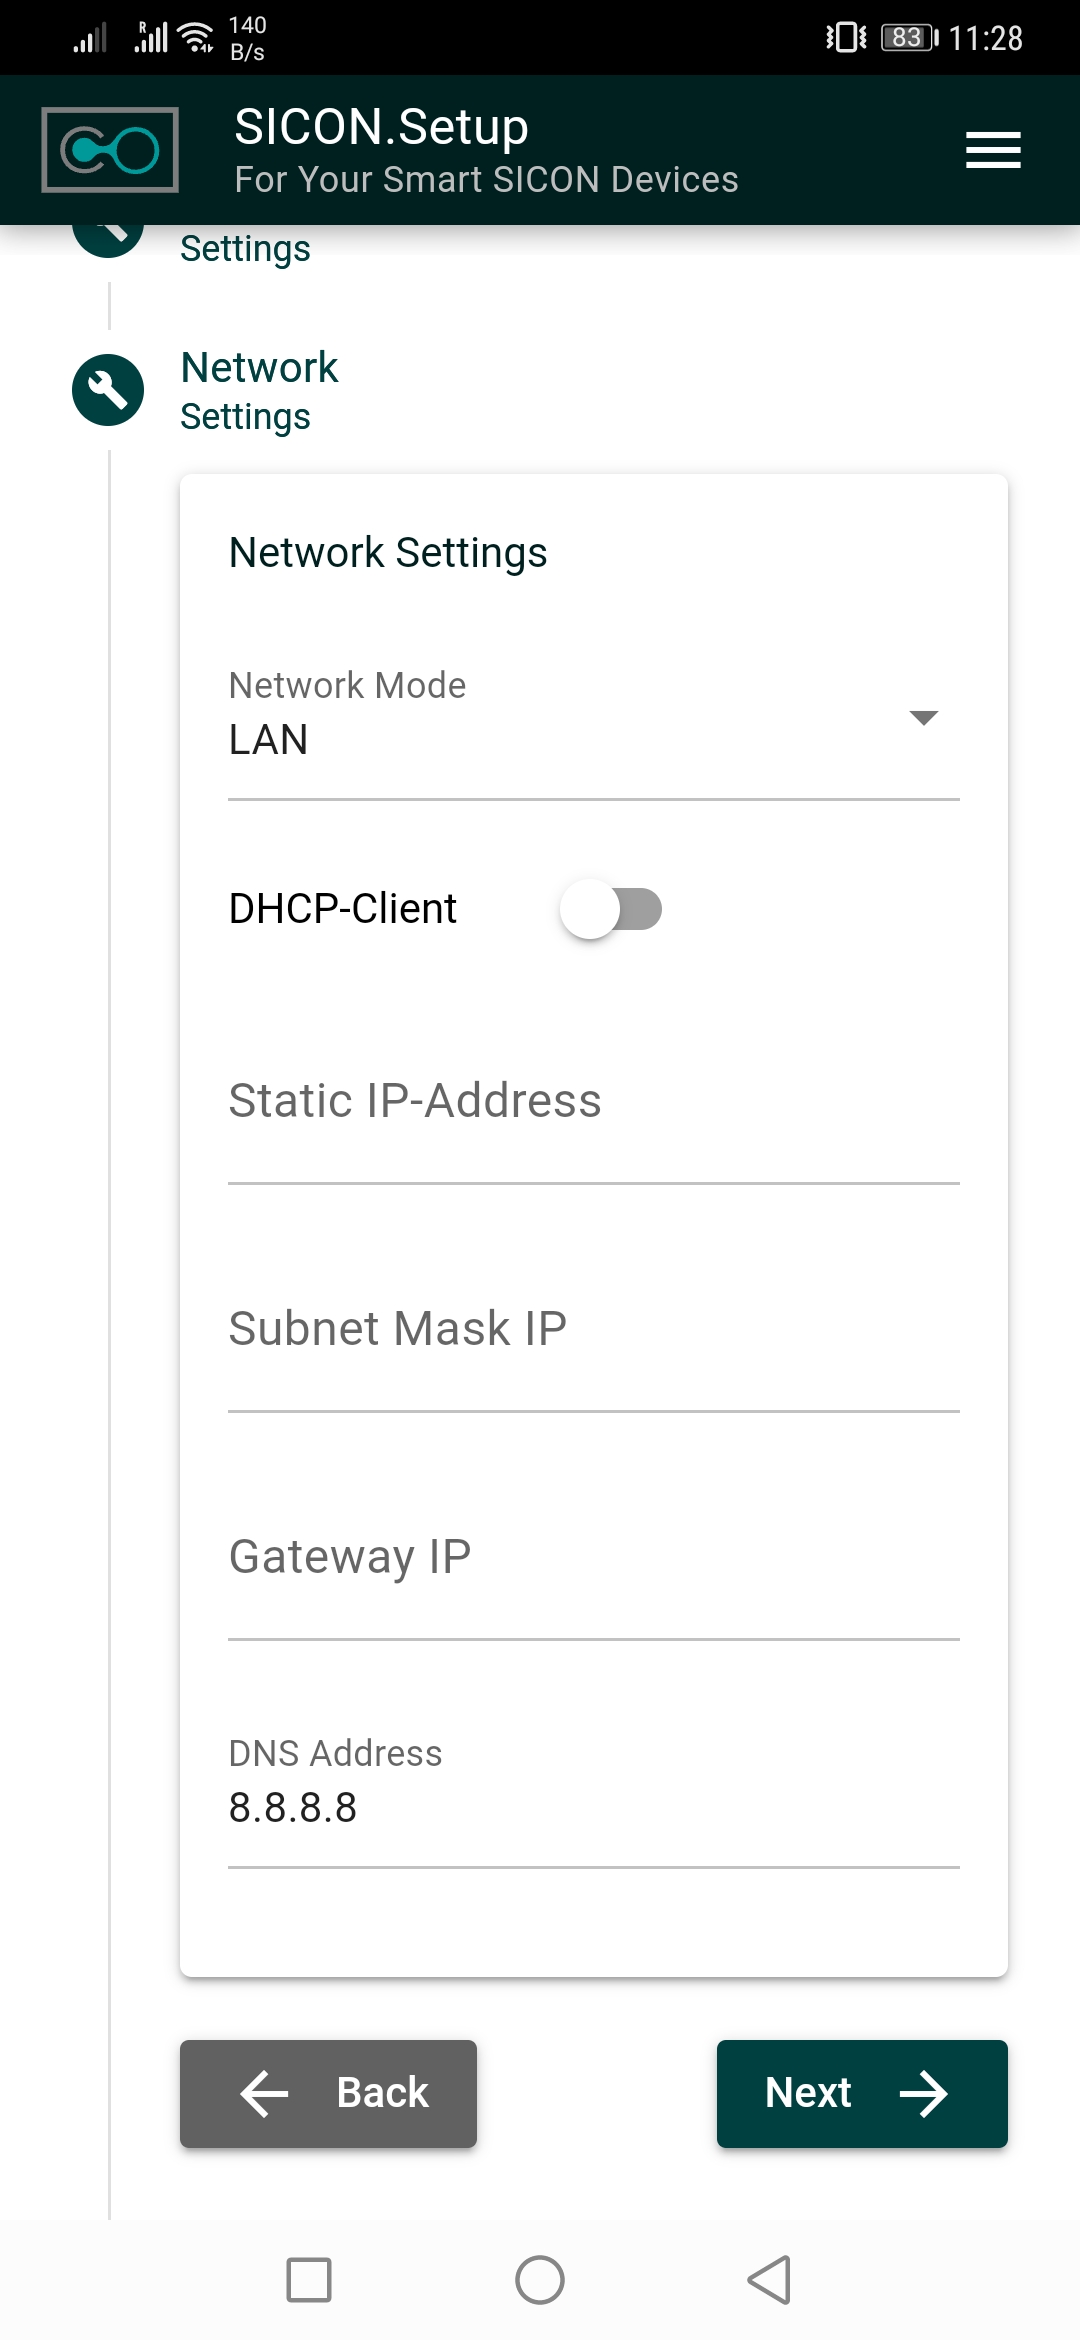
2.3 Network connection:
Now select whether you want to connect the device wireless via WLAN or via Ethernet to the company network.
Network Mode
The selected Network Mode is set to WLAN.
A dropdown menu allows changing the network type i.e LAN
a. WLAN Setup Methods
The user can configure the wireless connection in two ways:
Option A – Scan WLAN QR Code
By pressing “Scan WLAN QR-Code”, the device can automatically retrieve network credentials from a QR code.
This method simplifies configuration and reduces manual input errors.
Option B – Manual Network Selection
If no QR code is used:
Select Wireless Network
A dropdown list allows the user to choose from available nearby Wi-Fi networks.
“If there is no nearby access point found, you can scan your environment again with the REFRESH BUTTON .“
WLAN Password
The password for the selected network must be entered manually.
Connection Test
The “Test” button verifies whether the entered credentials allow a successful connection to the selected WLAN.
This ensures the device can communicate with the network before proceeding.
.jpg?inst-v=f2dae426-6731-46dd-862f-09b2903b122f)
b. Ethernet connection
For this type of connection, it is necessary to connect your SICON.PLUG to your network using an ethernet cable.
Under Network mode, select Ethernet. Now you can choose whether you want to integrate your SICON.PLUG into your network as a DHCP client or configure the network settings manually.
If you keep the setting DHCP client, the device receives all required settings via the network.
Please note that the IP address is assigned dynamically, i.e. the IP address may have changed after each restart of the device.
If you do not want to do this, please make the settings manually and assign a static IP address to the SICON.PLUG.
If you have decided to set the network parameters manually, you can now enter the settings in the corresponding fields. You should ask your network administrator for these settings beforehand.
If you want a local installation, please make sure that the SICON.PLUG and the OT side of your edge computer, e.g. SICON.OS, is located in the same network.
2.4 Parameters (Digital Twin):
a. Please select the Device parameter settings e.g. Localization.
Please fill in the following fields given in Device parameters settings under Localization.
Custom Name → Internal name of the Plug.
Plant identification→ Individual label that clearly identifies the plant in which your Plug is installed.
Location label → Location where the Plug is installed.
Asset ID → Asset ID defined for the corresponding Plug.
Geolocation → Place/city where the Vacuum Generator is located.
Installation Date → Date when the Plug was put into operation.
.jpg?inst-v=f2dae426-6731-46dd-862f-09b2903b122f)
.jpg?inst-v=f2dae426-6731-46dd-862f-09b2903b122f)
b. Open the Subdevices section & select the Subdevice i.e Vacuum Generator. Now click on the NEXT.
.jpg?inst-v=f2dae426-6731-46dd-862f-09b2903b122f)
2.5 Connection to the IOT platform
In the last configuration step you have to define to which IOT platform your SICON.PLUG should connect. i.e my.cloud.sicon.eco
In Step 1.3, if you selected “Skip to Setup,” you must manually enter the connection settings. If you logged in during this step, the connection settings are applied automatically.
.jpg?inst-v=f2dae426-6731-46dd-862f-09b2903b122f)
Click on CHANGE button if you want to change the IOT Platform anytime. You can connect your SICON.PLUG to following IOT platform:
a. SICON.OS onPrem
b. SICON.OS onCloud
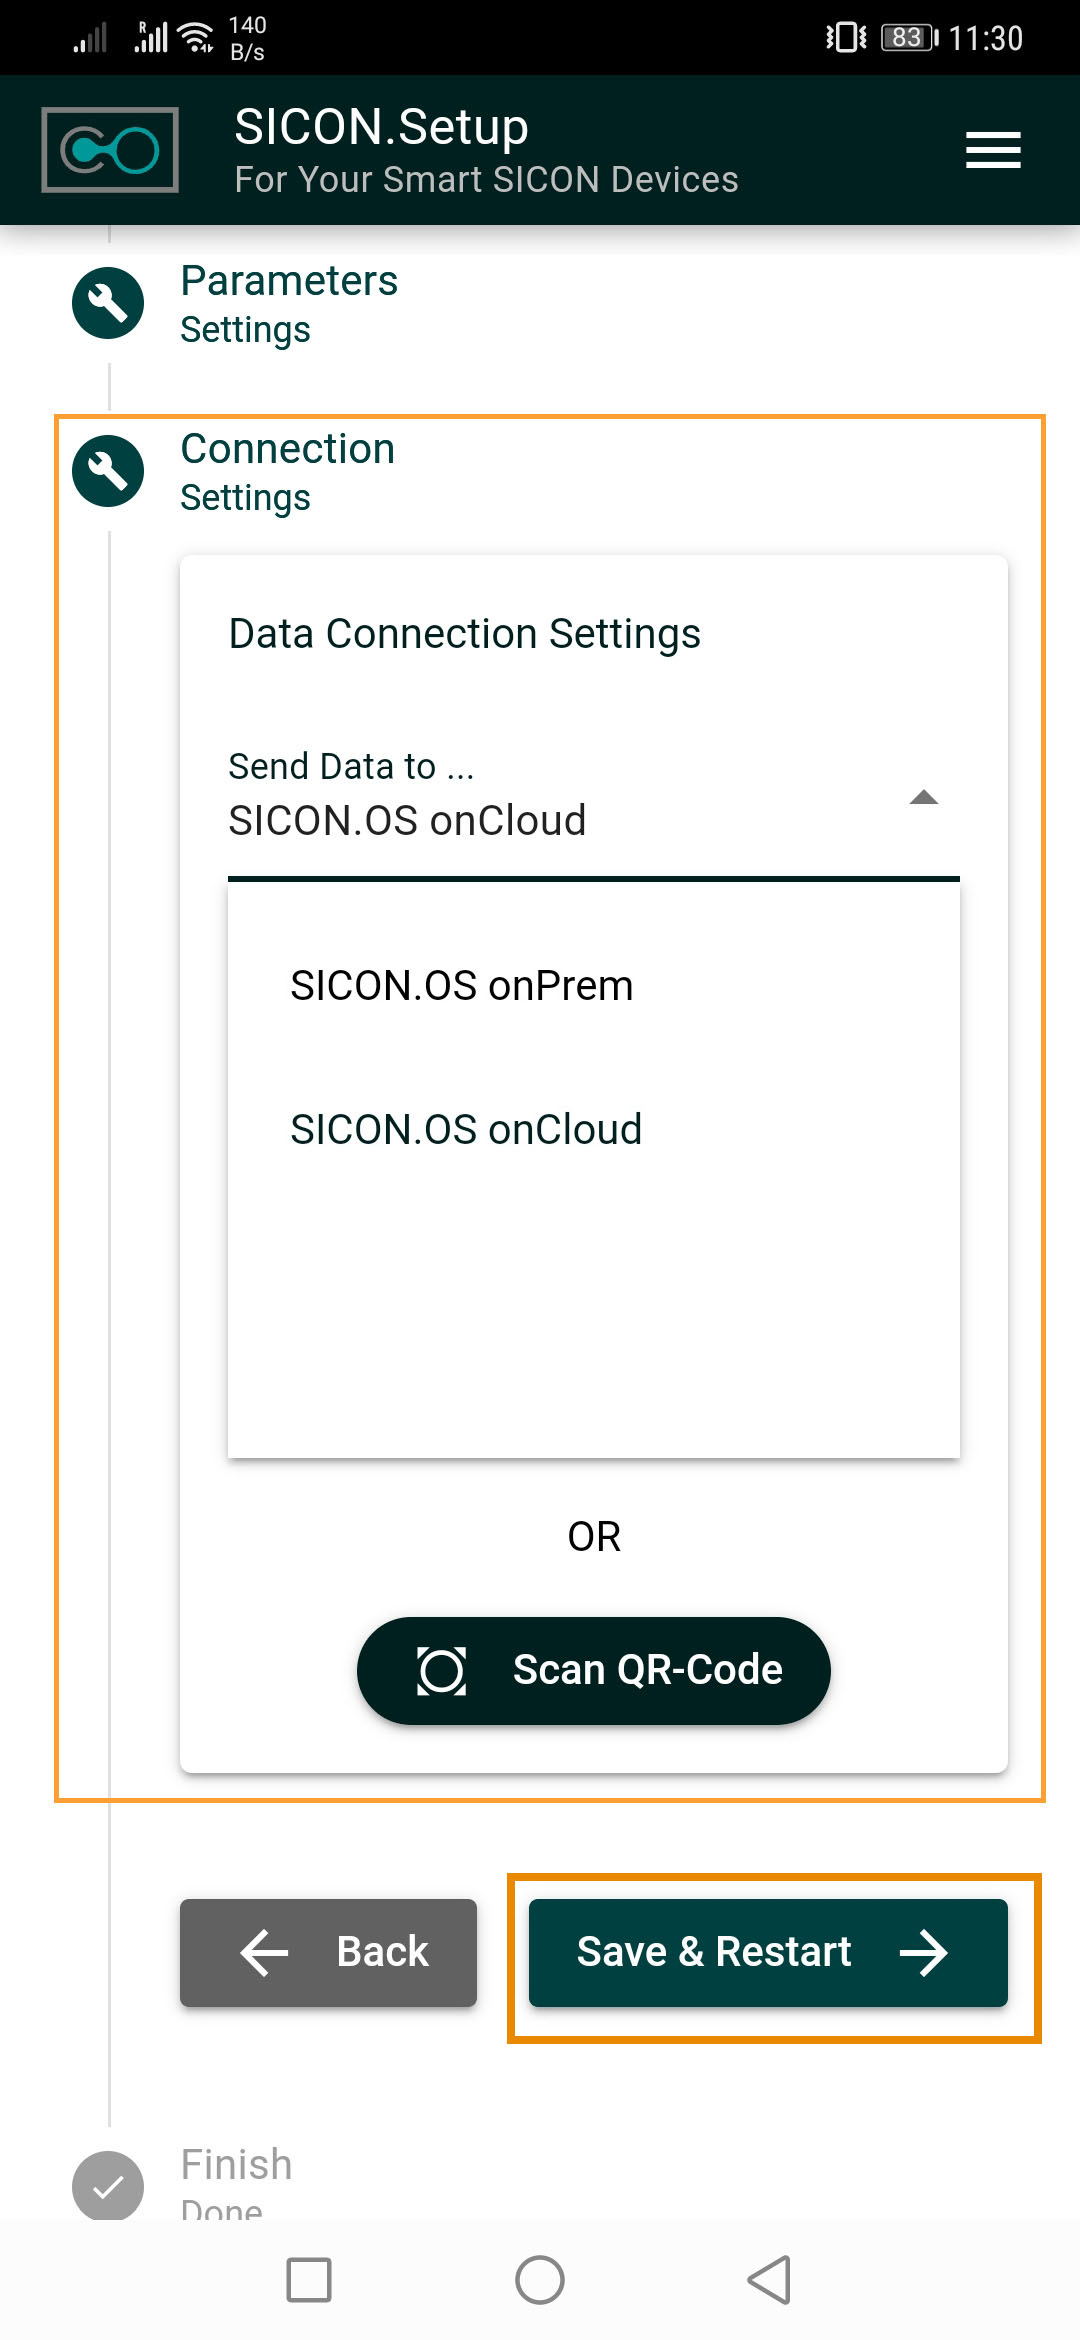
a. Connection to a Cloud (SICON.OS On Cloud)
If you have chosen a cloud solution, please select the OnCloud setting in the drop-down menu and fill in the following fields:
Enter the address where your cloud can be found in the URL field i.e my.cloud.sicon.eco
Enter your access data for your cloud under Username and Password.
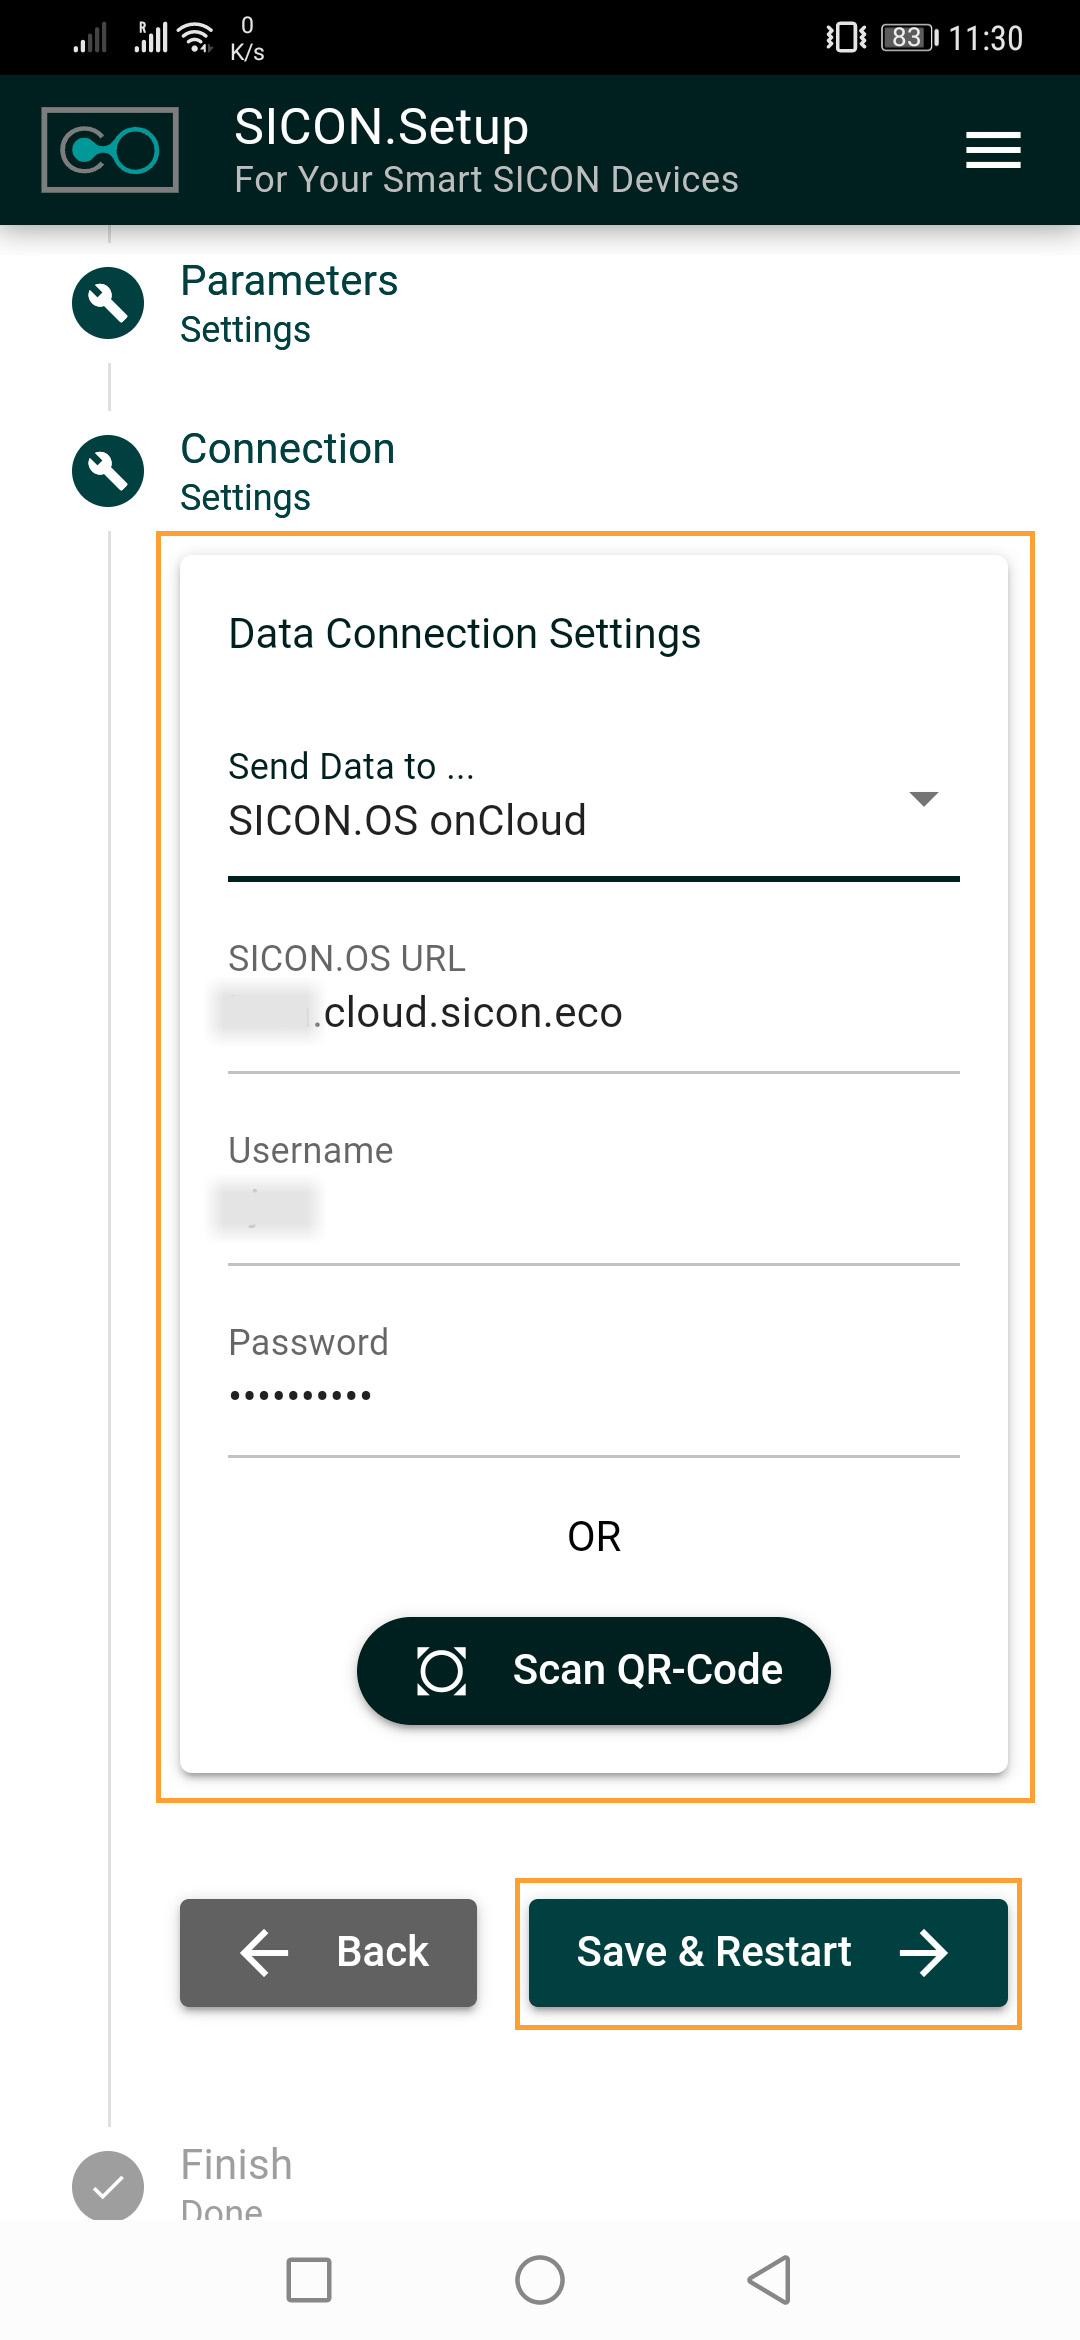
18. Click on SAVE & RESTART button to complete the registration. The device restarts and adopts the settings. If you have entered everything correctly, the plug connects to the desired cloud after clicking on Save & Restart.
.jpg?inst-v=f2dae426-6731-46dd-862f-09b2903b122f)
To go back to Homepage, click on HOME Button.
Next step: Access Reporting & Notifications
After completing the setup and clicking the HOME button in the SICON.Toolbox App, you will return to the main dashboard of the application. From here, you can access additional features such as device reports, notifications, and further configuration options.
These features allow you to:
Monitor device status and generated reports
Receive alerts and notifications about events or warnings
Configure reporting rules and notification channels
Manage how device data is delivered to users or systems
To learn how to view reports, configure notifications, and manage reporting settings, continue with the following guide:
➡ Reporting & Notifications
https://docs.service.sicon.eco/de/sicon.plug/Working-version/reporting-notifications
This section explains how to configure reporting behavior and how notifications can be sent via different channels such as email, web notifications, or other integrations.